Tuesday, June 12, 2012
Spanish sauteed mushrooms with arugula
I promised a while back to share a recipe for sauteed mushrooms topped with arugula. I almost forgot! But here I am.
This dish was inspired by Ocho, a tapas restaurant here in Seattle that is a favorite date night destination for my man and me. Seriously, we get out once a month and I think we've been there at least four times in the past year, which, if you do the math, works out to quite a strong recommendation. The food is affordable (downright cheap for the quality), the cocktails are strong (I especially recommend the Dark & Stormy), and it's vegetarian-friendly (pretty rare feat for a tapas place).
One of our favorite tapas there is a kind of crostini topped with sherried mushrooms and a big mound of slivered arugula. The mushrooms have a subtle, pleasant heat that plays nicely off the sweetness of the sherry, and it turns out that the secret to this is just a little bit of cayenne pepper.
From a recipe for mushroom ragout in Yotam Ottolenghi's cookbook Plenty I took the idea of serving the mushrooms over croutons rather than slices of bread. This is a big improvement as it makes the deliciousness easier to shovel in one's mouth in large quantities.
The recipe below makes a light lunch or dinner for 2 people. I'd say it would probably serve 4 or more as a starter (before paella, perhaps? I'm eager to try the vegetable paella recipe in Plenty) or side dish. Or, you could make it a more substantial main course with the addition of that universal culinary solution, the poached egg.
Setas Ocho
4 C. of 1-inch-square cubes of crusty bread (about 5 slices)
Olive oil
salt
8 oz. button or crimini mushrooms, sliced
3 large cloves garlic, peeled
1/8 tsp. cayenne pepper
1 1/2 Tbsp. sherry
A couple handfuls of youngish, tender arugula leaves, washed, dried, and finely sliced
Heat a large skillet over medium heat and coat the bottom with a very thin layer of oil. Throw in the cubed bread, sprinkle with a bit of salt, and cook, stirring occasionally, until the bread is nicely toasted on all sides.
Meanwhile, heat another skillet over medium heat and add about a tablespoon of olive oil. Add the sliced mushrooms and a pinch of salt, and stir to coat with the oil. Mince or press the garlic and add to the pan, along with the cayenne. Saute, stirring occasionally, until the mushrooms begin to soften. Then add the sherry and continue to cook until they are very tender and the liquid in the pan has cooked down to a glisten.
To assemble, place croutons on a plate, top with mushrooms, and then a shower of arugula.
Monday, June 11, 2012
Weekending
A new (to us; thanks, Craigslist!) patio table and chairs, and a glass of wine the color of sunset.
I have high hopes that this is going to greatly improve my work life over the next few months. (The table and chairs, that is, not the wine!)
Sunday, June 10, 2012
Friday, June 8, 2012
Twirling Rainbow Skirt Tutorial
Friday flowers are moving to Saturday this week, so that I can give you this tutorial for a skirt I'm submitting (just under the wire!) as part of Skirt Week over at Crafterhours.
So, my girl is not particularly girly (no Princess Tea Parties in this house), but two girly things she does love are rainbows and twirly skirts.

In fact, when she first discovered the idea of twirly skirts, about a year ago, we spent some time trying on all the skirts that she then owned, about 14 of them (which sounds {is} excessive, but she has a girl cousin who is 16 months older and a mom who loves thrifting, so there you go). And wouldn't you know it? Every single one of them was "not twirly enough."

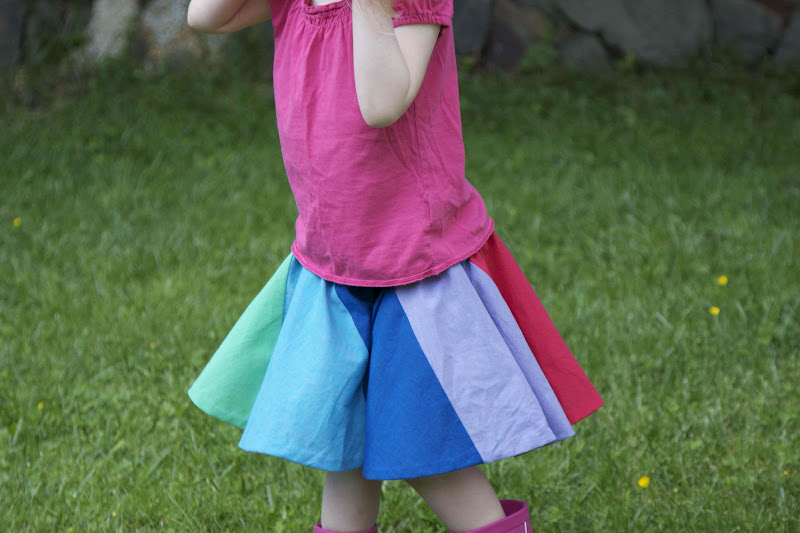
We have since stocked her closet with several sufficiently twirly skirts, but nevertheless I decided that I wanted to make a skirt that would combine her longstanding love of twirly skirts with her more new-found obsession with rainbows. The whole idea started with this image:
I know, an odd image to inspire a small child's wardrobe, but I thought it would be neat to try to create a skirt that looks like it is twirling even when it is still.
My pattern is based on this circle skirt tutorial from Dana at MADE. I've divided the skirt into 7 angled sections, one for each color of the rainbow, and used a foldover waistband casing for elastic (rather than stitching wide elastic directly to the skirt as Dana does). The foldover waistband means that the skirt has no front and back, so you can wear your favorite colors (in our case, purple and blue) in front.

Would you like to know how to make it? I took pictures!
Drafting the Pattern
Draw your quarter-circle pattern using Dana's tutorial on a folded piece of paper. (Add a little bit of length to account for the fact that we're going to make a turned-over waistband.)

Cut along the outer edge of the quarter-circle and unfold into a half-circle. (DO NOT cut out the middle of the circle.)

Align the center hole of a protractor (oh, yes, a protractor! Nerds FTW! I knew there was a reason I've kept that thing around for the last 22 years.) with the center of the circle at the edge of the paper.

We're going to make this skirt out of 7 different colors of fabric (you know, ROY G. BIV). Each color will get a wedge that is 1/7th of a circle. 360 degrees in a circle divided by 7 = ~51.5 degrees. So use your protractor to make a mark at 51.5 degrees.

Draw a straight line from the center of the circle through the mark you just made at 51.5 degrees and out to the edge of the circle.

Here's your first wedge-shaped skirt section.

Now repeat the process, this time aligning the protractor with the center of the circle and the line you just drew...

…making a mark at 51.5 degrees…

…and drawing another line to make a second wedge.

Now we're going to make the rainbow twirl, by shifting the bottom edge of each skirt section relative to the top edge. So, draw a line from the top of the skirt* at the edge of the paper, to the bottom of the skirt at the first wedge you marked off.
(*Note that you're now starting your line from the top/waistband of the skirt--the inside circle--not the center of the circle.)

And another line from the top of the skirt at the first wedge, to the bottom of the skirt at the second wedge. So there's the shape of your pattern for the skirt sections.

But wait! Don't cut it out yet! Add seam allowances (I used 1/2 inch).

And there's your pattern piece!

I've given lots of detail here, because I think a similar method could be adapted to make a skirt with a different number of sections, different angles, etc.
Cutting and Sewing
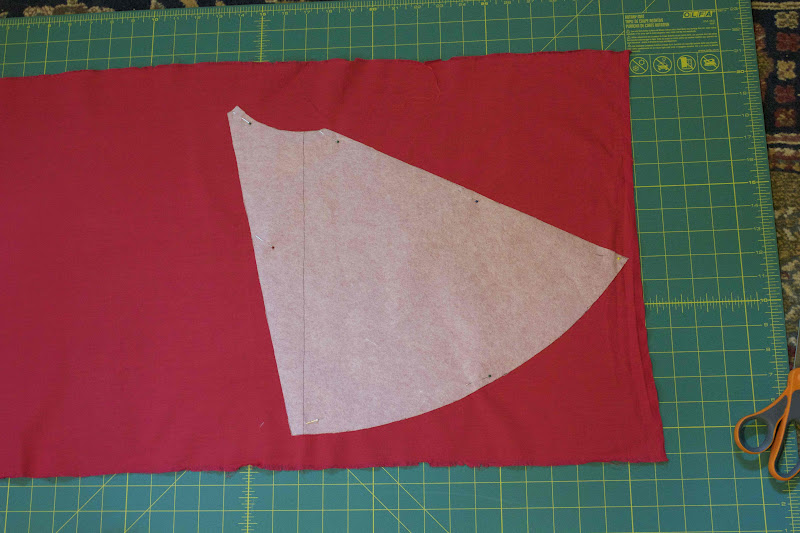
Lay your pattern piece (I transferred mine from drawing paper to Swedish tracing paper for better durability) out on your first piece of fabric.
I aligned the grain of the fabric with the line that marked off my first wedge when I was drafting the pattern. I wasn't super diligent about this (and maybe someone with more experience at draping would tell me why this was exactly the wrong choice), but this way all of the skirt sections had roughly the same orientation with the grain line. I did not have any trouble sewing the seams on (or nearly on) the bias.
You can also see that you could easily get the skirt sections out of a fat quarter of fabric (though maybe not for a very much bigger kid--this fits an average-sized almost-five-year-old). I couldn't find fat quarters or sets thereof in the fabric that I wanted so I bought half-yards.
So, then cut out the rest of the sections. Well, hello there, Roy G. Biv! These fabrics are Kaffe Fassett shot cottons by Rowan Fabrics in the following colors: 44 Scarlet, 35 Sunshine, 34 Lemon, 92 Cactus, 51 Forget Me Not, 45 True Cobalt, 14 Lavender. I bought mine from Purl Soho. I am in loooove with this fabric, it is utterly dreamy to sew with.

I always zigzag my edges before sewing my seams--my mom taught me to do that. It seems like finishing seams after they are sewn is what people tend to do nowadays?
Anyway, line up the leading edge of your red piece with the trailing edge of your orange piece, like so.

Pin and then sew together with a half-inch seam. Press, to set your stitches, and then press the seam towards the first (red) fabric. Always press your seams in this direction, and you will get a relatively smooth circle in the center.

Repeat the process, sewing yellow to orange, green to yellow, and so on...

..until sewing red to violet brings your skirt full circle.
Oh crap, I just made the Apple Spiral of Death, didn't I?

Now we're going to make the waistband. I have to warn you, this is not the most fun thing you are going to do today. (I mean, turning a smaller circle down onto a larger circle, and all with a bunch of fabric sections off-grain…oy.) But I am going to show you how to do it in a relatively tidy, methodical but low-stress way.
First, make a series of marks on the right side of the fabric 1/4 inch away from the inside edge of the circle. Turn towards the wrong side of the fabric and press.

Edge-stitch to hold the fold in place. (Yes, this is an extra step--you could just fold the fabric over again to form your casing, but I think stitching it makes the fabric easier to control here. Plus, the edge stitching will provide a guide to stitch along when you sew the casing.)

Now make a series of marks on the wrong side of the fabric 1 inch from the new edge of the inside circle.

Set your stitch length to the longest it will go and run a line of basting stitches around the circle along the marks you just made. (Uh, try to ignore the fact that in the picture the marks and stitches are not aligned! I realized that I'd marked at 3/4 inch rather than 1 inch.)

Now pull the basting threads to gather the skirt slightly, making the circle of basting threads the same circumference as the inside edge of the circle. (Again, I know this is an extra step in some sense: you could skip the basting and just ease the extra fabric in when you turn down the waistband casing. I did that when I made the muslin of this skirt and it was…more or less fine; the uneven gathers were hidden once I got the elastic in. But I hate feeling like I am fudging when I am sewing. This way is controlled fudging, which makes me much less anxious somehow.)

Turn down your waistband casing towards the inside of the skirt, aligning the edge of the fabric with the basting stitches. Press and pin. Then sew (follow the line of stitches you made when you first turned down the edge of the fabric), leaving a gap so that you can insert the elastic.
Thread 1/4 or 3/8 inch elastic sized to fit your child's waist into the casing, sew the ends of the elastic together, and sew up the casing.

Trim to even up the bottom edge of the skirt, if necessary.


Finish the hem as you will. I did a round of fake overlock stitch at the edge to prevent fraying, then turned up 1/2 inch and hand-sewed an invisible hem.
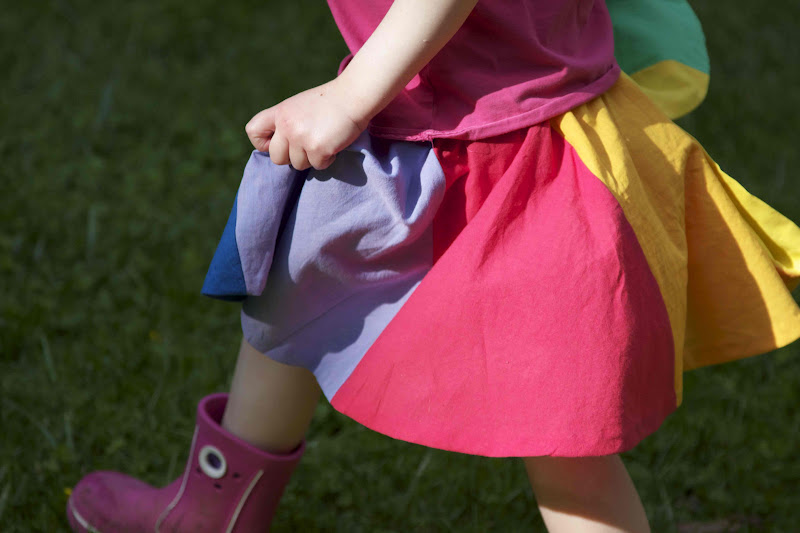
Voila!

Are you ready for some more gratuitous action shots? Good, because here they come!


So, my girl is not particularly girly (no Princess Tea Parties in this house), but two girly things she does love are rainbows and twirly skirts.

In fact, when she first discovered the idea of twirly skirts, about a year ago, we spent some time trying on all the skirts that she then owned, about 14 of them (which sounds {is} excessive, but she has a girl cousin who is 16 months older and a mom who loves thrifting, so there you go). And wouldn't you know it? Every single one of them was "not twirly enough."

We have since stocked her closet with several sufficiently twirly skirts, but nevertheless I decided that I wanted to make a skirt that would combine her longstanding love of twirly skirts with her more new-found obsession with rainbows. The whole idea started with this image:
I know, an odd image to inspire a small child's wardrobe, but I thought it would be neat to try to create a skirt that looks like it is twirling even when it is still.
My pattern is based on this circle skirt tutorial from Dana at MADE. I've divided the skirt into 7 angled sections, one for each color of the rainbow, and used a foldover waistband casing for elastic (rather than stitching wide elastic directly to the skirt as Dana does). The foldover waistband means that the skirt has no front and back, so you can wear your favorite colors (in our case, purple and blue) in front.

Would you like to know how to make it? I took pictures!
Drafting the Pattern
Draw your quarter-circle pattern using Dana's tutorial on a folded piece of paper. (Add a little bit of length to account for the fact that we're going to make a turned-over waistband.)

Cut along the outer edge of the quarter-circle and unfold into a half-circle. (DO NOT cut out the middle of the circle.)

Align the center hole of a protractor (oh, yes, a protractor! Nerds FTW! I knew there was a reason I've kept that thing around for the last 22 years.) with the center of the circle at the edge of the paper.

We're going to make this skirt out of 7 different colors of fabric (you know, ROY G. BIV). Each color will get a wedge that is 1/7th of a circle. 360 degrees in a circle divided by 7 = ~51.5 degrees. So use your protractor to make a mark at 51.5 degrees.

Draw a straight line from the center of the circle through the mark you just made at 51.5 degrees and out to the edge of the circle.

Here's your first wedge-shaped skirt section.

Now repeat the process, this time aligning the protractor with the center of the circle and the line you just drew...

…making a mark at 51.5 degrees…

…and drawing another line to make a second wedge.

Now we're going to make the rainbow twirl, by shifting the bottom edge of each skirt section relative to the top edge. So, draw a line from the top of the skirt* at the edge of the paper, to the bottom of the skirt at the first wedge you marked off.
(*Note that you're now starting your line from the top/waistband of the skirt--the inside circle--not the center of the circle.)

And another line from the top of the skirt at the first wedge, to the bottom of the skirt at the second wedge. So there's the shape of your pattern for the skirt sections.

But wait! Don't cut it out yet! Add seam allowances (I used 1/2 inch).

And there's your pattern piece!

I've given lots of detail here, because I think a similar method could be adapted to make a skirt with a different number of sections, different angles, etc.
Cutting and Sewing
Lay your pattern piece (I transferred mine from drawing paper to Swedish tracing paper for better durability) out on your first piece of fabric.
I aligned the grain of the fabric with the line that marked off my first wedge when I was drafting the pattern. I wasn't super diligent about this (and maybe someone with more experience at draping would tell me why this was exactly the wrong choice), but this way all of the skirt sections had roughly the same orientation with the grain line. I did not have any trouble sewing the seams on (or nearly on) the bias.
You can also see that you could easily get the skirt sections out of a fat quarter of fabric (though maybe not for a very much bigger kid--this fits an average-sized almost-five-year-old). I couldn't find fat quarters or sets thereof in the fabric that I wanted so I bought half-yards.
So, then cut out the rest of the sections. Well, hello there, Roy G. Biv! These fabrics are Kaffe Fassett shot cottons by Rowan Fabrics in the following colors: 44 Scarlet, 35 Sunshine, 34 Lemon, 92 Cactus, 51 Forget Me Not, 45 True Cobalt, 14 Lavender. I bought mine from Purl Soho. I am in loooove with this fabric, it is utterly dreamy to sew with.

I always zigzag my edges before sewing my seams--my mom taught me to do that. It seems like finishing seams after they are sewn is what people tend to do nowadays?
Anyway, line up the leading edge of your red piece with the trailing edge of your orange piece, like so.

Pin and then sew together with a half-inch seam. Press, to set your stitches, and then press the seam towards the first (red) fabric. Always press your seams in this direction, and you will get a relatively smooth circle in the center.

Repeat the process, sewing yellow to orange, green to yellow, and so on...

..until sewing red to violet brings your skirt full circle.
Oh crap, I just made the Apple Spiral of Death, didn't I?

Now we're going to make the waistband. I have to warn you, this is not the most fun thing you are going to do today. (I mean, turning a smaller circle down onto a larger circle, and all with a bunch of fabric sections off-grain…oy.) But I am going to show you how to do it in a relatively tidy, methodical but low-stress way.
First, make a series of marks on the right side of the fabric 1/4 inch away from the inside edge of the circle. Turn towards the wrong side of the fabric and press.

Edge-stitch to hold the fold in place. (Yes, this is an extra step--you could just fold the fabric over again to form your casing, but I think stitching it makes the fabric easier to control here. Plus, the edge stitching will provide a guide to stitch along when you sew the casing.)

Now make a series of marks on the wrong side of the fabric 1 inch from the new edge of the inside circle.

Set your stitch length to the longest it will go and run a line of basting stitches around the circle along the marks you just made. (Uh, try to ignore the fact that in the picture the marks and stitches are not aligned! I realized that I'd marked at 3/4 inch rather than 1 inch.)

Now pull the basting threads to gather the skirt slightly, making the circle of basting threads the same circumference as the inside edge of the circle. (Again, I know this is an extra step in some sense: you could skip the basting and just ease the extra fabric in when you turn down the waistband casing. I did that when I made the muslin of this skirt and it was…more or less fine; the uneven gathers were hidden once I got the elastic in. But I hate feeling like I am fudging when I am sewing. This way is controlled fudging, which makes me much less anxious somehow.)

Turn down your waistband casing towards the inside of the skirt, aligning the edge of the fabric with the basting stitches. Press and pin. Then sew (follow the line of stitches you made when you first turned down the edge of the fabric), leaving a gap so that you can insert the elastic.
Thread 1/4 or 3/8 inch elastic sized to fit your child's waist into the casing, sew the ends of the elastic together, and sew up the casing.

Trim to even up the bottom edge of the skirt, if necessary.


Finish the hem as you will. I did a round of fake overlock stitch at the edge to prevent fraying, then turned up 1/2 inch and hand-sewed an invisible hem.
Voila!

Are you ready for some more gratuitous action shots? Good, because here they come!


Tuesday, June 5, 2012
A post I plan to refer back to often
Elapsed time: 4 months:

Uggghhhhh. But....
4 months + 20 minutes:
(Sorry, blurry camera phone pic. Can't stop for proper photography when you're on a roll like this!)

(Yes, a timer and everything. It really works for me!)
4 months + 40 minutes:

(I'd still like to hang the thread rack, but my contractor informs me this will require sinking anchors in the wall, and I don't want to do that until I'm sure this part of the room isn't getting rearranged.)
It doesn't take that long! Why do I have such trouble remembering that fact?
Bonus: and thus it has pretty much remained ever since. (Sometimes--not always--a surface is a clutter magnet because it's already cluttered. And clearing it off makes it suddenly not a good place for clutter.)
More inspiration along these lines: Unfuck Your Habitat. The cursing really helps, trust me.

Uggghhhhh. But....
4 months + 20 minutes:
(Sorry, blurry camera phone pic. Can't stop for proper photography when you're on a roll like this!)
(Yes, a timer and everything. It really works for me!) 4 months + 40 minutes:

(I'd still like to hang the thread rack, but my contractor informs me this will require sinking anchors in the wall, and I don't want to do that until I'm sure this part of the room isn't getting rearranged.)
It doesn't take that long! Why do I have such trouble remembering that fact?
Bonus: and thus it has pretty much remained ever since. (Sometimes--not always--a surface is a clutter magnet because it's already cluttered. And clearing it off makes it suddenly not a good place for clutter.)
More inspiration along these lines: Unfuck Your Habitat. The cursing really helps, trust me.
Friday, June 1, 2012
Friday flowers
Subscribe to:
Posts (Atom)